
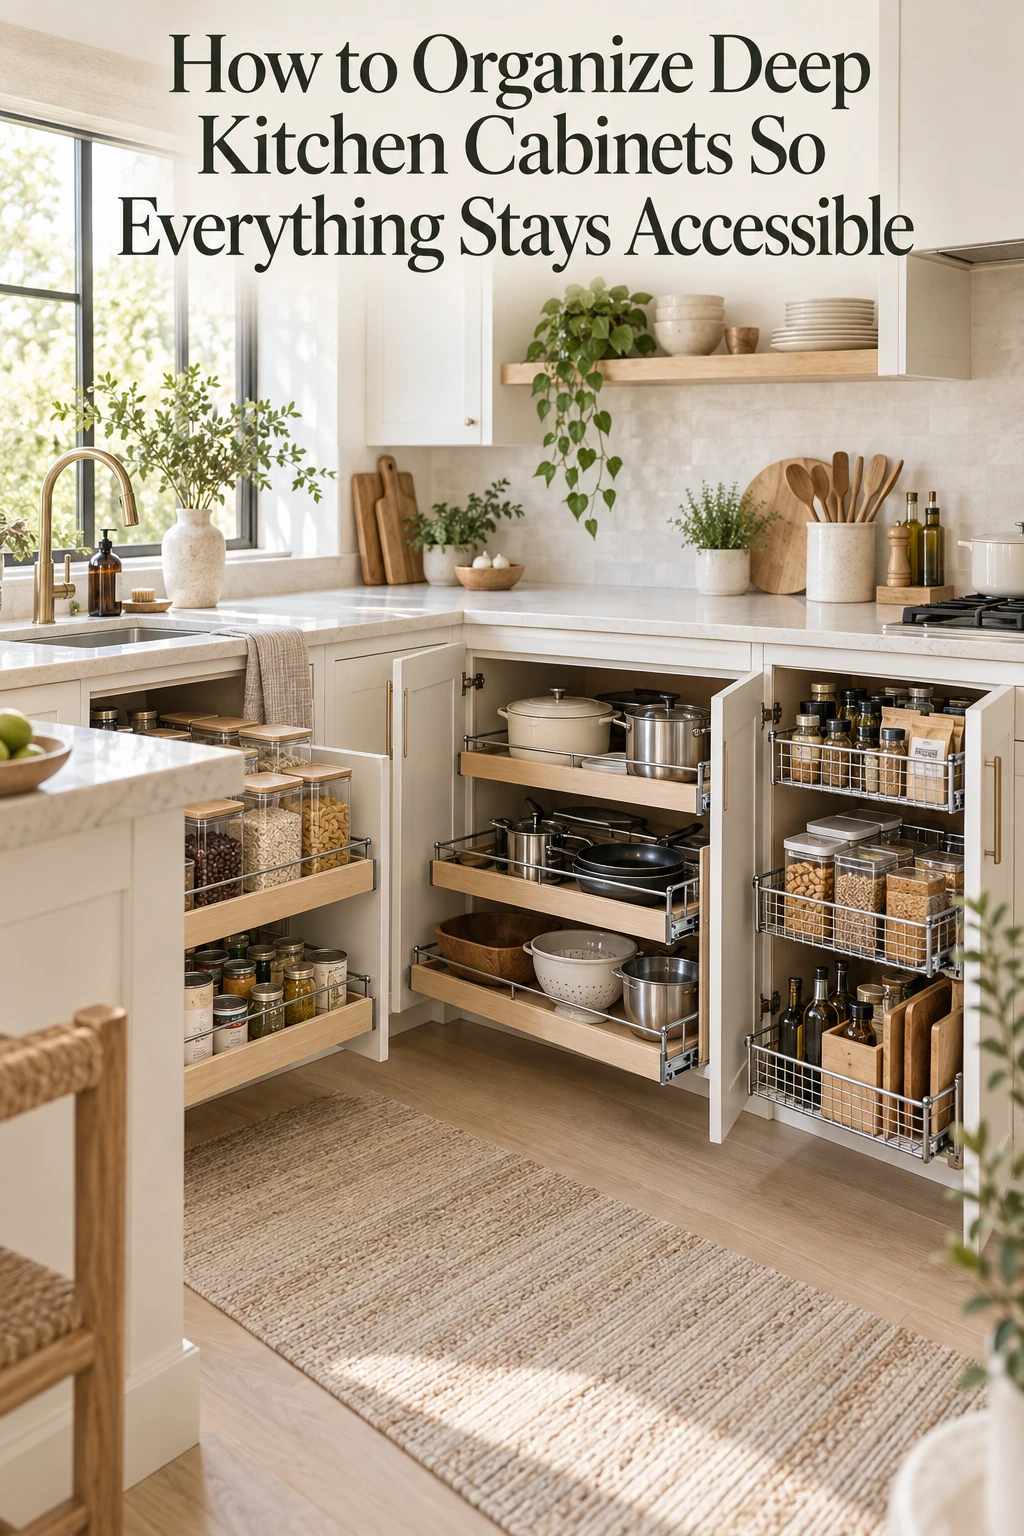
Turn cabinet depth into usable storage by keeping daily items at the front, grouping occasional items at the back in removable units, and matching pull-outs, bins, risers, turntables, drawers, or dividers to the category’s size, weight, and frequency.
The Finished Result
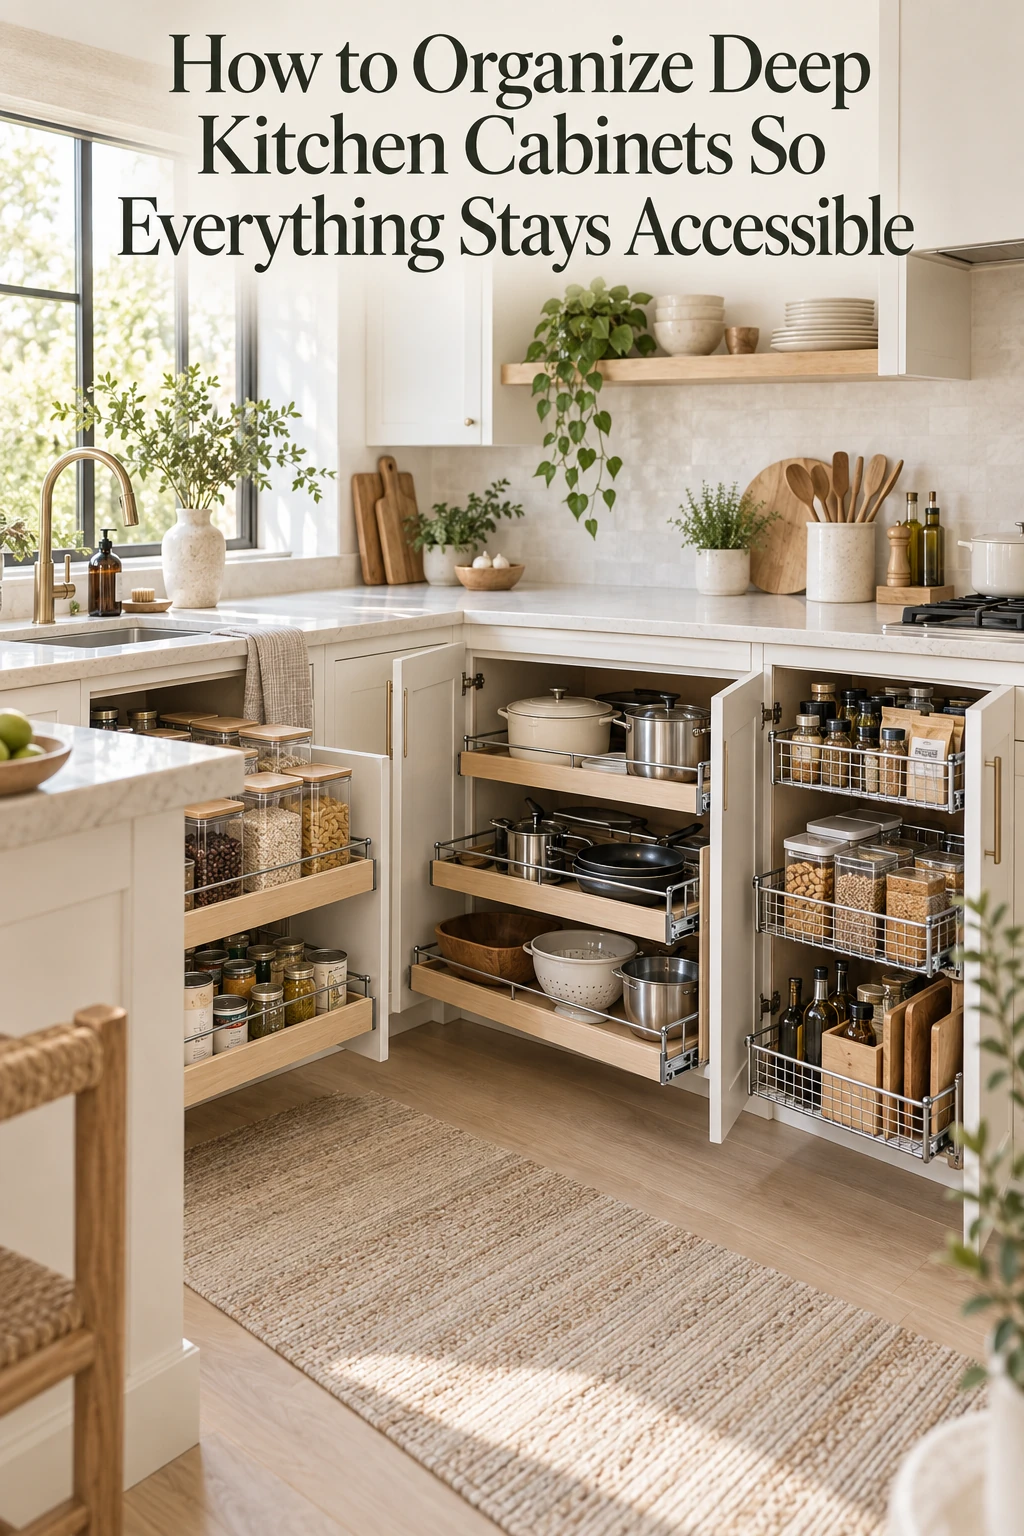
The cabinet no longer acts like a dark storage tunnel. Daily items stay visible and easy to return, occasional items sit in planned secondary zones, small objects are contained, large items can be removed independently, and the back remains accessible without unloading the entire shelf.
- Front, middle, and back zones are intentional
- Item size and frequency determine placement
- Upper and lower cabinets use different strategies
- Height and depth problems are treated separately
- The simplest workable system wins
Quick Answer
Organize deep kitchen cabinets by storing large, related categories together and dividing each shelf into accessible front and back zones. Keep daily items at the front, place occasional items behind them only when they can be removed as one contained group, and use pull-outs, long bins, risers, or turntables only when they improve access to the specific category.
For the broader kitchen system, use how to organize a small kitchen or the Kitchen Organization Guide. For pantry-specific use of deep cabinets, see how to organize a kitchen without a pantry, the deep-pantry guide, and the Pantry Organization Guide.
Why Deep Kitchen Cabinets Become Disorganized
| Cabinet symptom | Likely cause | First correction |
|---|---|---|
| Items disappear at the back | Small items are stored loose | Contain the category or add a pull-out |
| Front items block everything | No access path to the back | Separate front and back groups |
| Shelves look full but hold little | Vertical space is unused | Adjust shelves or add a riser |
| Bins are difficult to remove | They are too heavy or too deep | Reduce contents or use smaller groups |
| Food expires unseen | Inventory is layered | Improve visibility and rotate older food forward |
| Pots are difficult to retrieve | Cookware is nested too deeply | Separate lids and reduce stacking |
| Appliances are never used | Access requires too much lifting | Move them to a safer, more accessible location |
Core principle
Depth is not useful capacity unless the reader can access and reset it.
Decide What Should Be Stored in a Deep Cabinet
Usually works well
- Large cookware
- Mixing bowls
- Small appliances
- Food backstock
- Large serving pieces
- Baking equipment
- Grouped pantry categories
- Food-storage containers
- Large lightweight items
Often works poorly
- Loose spice jars
- Small packets
- Uncontained lids
- Mixed utensils
- Frequently used tiny items
- Heavy items behind other heavy items
- Categories requiring quick visual scanning
Category rule
Use deep storage for large categories or removable groups—not scattered small objects. If the cabinet is acting like a pantry, the same rule appears in pantry zoning, small-pantry organization, and pantries with no built-in shelves.
Empty and Assign One Cabinet at a Time
- Remove everything from one cabinet.
- Group items by function.
- Remove expired, broken, duplicate, or unused items.
- Identify which categories are used daily.
- Move unrelated categories elsewhere.
- Clean the empty cabinet.
- Measure before returning anything.
Keep the project contained
Do not empty the entire kitchen unless there is enough time and space to complete the project.
Give Each Deep Cabinet One Primary Function
Possible functions include food, cookware, appliances, baking, serving, food-storage containers, cleaning supplies where appropriate, or beverage supplies. If one cabinet becomes a beverage zone, use Coffee Station Storage Ideas, How to Organize a Coffee Station, or Coffee Station in a Cabinet to separate daily tools from backup supplies.
Good combinations
Closely related categories such as baking ingredients and baking tools, or cookware and lids, when they remain visually separated.
Poor combinations
Food with appliances, cookware with paper goods, cleaning supplies with food, or baking tools mixed with unrelated serving pieces.
Measure Before Choosing Organizers
Measure the cabinet
- Interior width, depth, and height
- Shelf thickness and spacing
- Face-frame opening
- Door opening and hinge position
- Center stile
- Plumbing or wiring
- Maximum pull-out extension
- Distance to nearby appliances or walls
Measure the contents
- Largest pot or pan
- Appliance footprint and height
- Tallest food package
- Longest container
- Largest bowl
- Lid dimensions
- Weight of grouped items
- Handle projection
Critical distinction
The usable opening may be narrower than the cabinet interior. An organizer can fit inside yet still be impossible to insert or pull out. That same real-clearance principle is important in vertical storage and other small-space storage systems.
Check Door and Shelf Clearance
Before using shelf risers, turntables, pull-outs, door-mounted storage, stacking drawers, or tall bins, confirm that:
- The door closes.
- Hinges remain clear.
- Shelves do not block the organizer.
- Items do not strike the shelf above.
- A pull-out can extend fully.
- Handles remain reachable.
Create Front, Middle, and Back Zones
Front zone
Daily cookware, active food, frequent appliances, everyday dishes, current containers, and common baking supplies.
Middle zone
Weekly-use categories, secondary tools, and items that remain visible and independently removable.
Back zone
Occasional items, backstock, seasonal serving pieces, extra dishes, and lightweight appliances grouped for removal.
Front-zone principle
The easiest-to-reach part of the cabinet should support the household’s most frequent tasks. Use the same logic as pantry zones: daily-use categories stay visible, while backup inventory moves behind or above.
Use Removable Groups Instead of Loose Layers
Suitable removable groups include baking supplies, breakfast items, snacks, appliance accessories, food-container lids, specialty cookware, and entertaining supplies.
Access test
The reader should be able to remove one group to reach the back—not five individual objects.
Choose the Right Storage Method
Pull-Out Shelves
Best for: Deep lower cabinets, heavy cookware, appliances, pantry food, frequent full-depth access, and readers who struggle to reach the back.
Advantages
- Brings the back forward
- Improves visibility
- Reduces bending and reaching
- Supports large categories
Limitations
- Higher cost
- Installation requirements
- Interior-width loss
- Weight limits
- Door and hinge interference
- May not suit rentals
Choose them for frequent access when the cabinet opening, frame, installation conditions, and budget support the system. Avoid them when portable bins already solve a light, occasional category.
A Pull-Out for Deep Base Cabinets
Use a pull-out only when bringing the entire category forward fixes the access problem.
 For full-depth access
Seinloes 2-Pack Expandable Pull-Out Cabinet Organizer
A slide-out option for deep base cabinets. Measure the usable opening, frame, hinges, and interior depth before choosing it.
View on Amazon →As an Amazon Associate, Inplanty may earn from qualifying purchases.
Long Handled Bins
Best for: Lightweight food, baking ingredients, snacks, backstock, and deep upper cabinets.
Advantages
- Portable
- Usually renter-friendly
- Keeps small items together
- Uses cabinet depth
Limitations
- Can become heavy
- Contents may be hidden
- Require full removal
- Very long bins can be awkward to clean
Bin rule
Use several moderate-capacity bins rather than one overloaded bin. This matters especially in a small pantry or when organizing snacks and spices that are easy to lose at the back.
Shelf Risers
Best for: Plates, bowls, cans, jars, short packages, and cabinets with unused vertical height.
Important distinction
Shelf risers solve height problems. They do not automatically solve depth problems. If vertical spacing is the real constraint, review the Pantry Shelf Spacing Guide before adding more layers.
A Riser for Wasted Cabinet Height
This is the lower-cost option when vertical clearance—not cabinet depth—is the real problem.
 For unused vertical space
X-cosrack Expandable Cabinet Organizer Shelf, 2 Pack
A freestanding riser for cabinets where shelf height is being wasted. It adds a level but does not solve inaccessible depth.
View on Amazon →As an Amazon Associate, Inplanty may earn from qualifying purchases.
Turntables
Best for: Bottles, sauces, condiments, and small jars where rotation improves access.
Avoid using them for bags, boxes, heavy bulk food, or cabinets where circular storage wastes too much rectangular space.
Turntable verdict
Use one when rotation improves access more than rectangular storage would improve capacity.
A Turntable for Bottles and Jars
Choose rotation when it makes a small category easier to scan and retrieve.
 For bottles and jars
LANDNEOO 10-Inch Non-Skid Lazy Susan Organizers, Set of 4
A rotating option for bottles, sauces, condiments, and jars when circular storage improves access without wasting too much cabinet space.
View on Amazon →As an Amazon Associate, Inplanty may earn from qualifying purchases.
Stacking Drawers or Sliding Baskets
Best for: Packets, snacks, food-storage supplies, and lightweight pantry categories. They separate layers but use interior height, may shift, and can become heavy when overfilled.
Vertical Dividers
Best for: Cutting boards, baking trays, pan lids, serving boards, muffin tins, and flat cookware. Dividers prevent unstable stacking and allow one item to be removed independently.
No-Organizer Method
A deep cabinet may need no purchased organizer when it stores only a few large items, categories are limited, occasional items remain behind daily items, each item can be removed independently, and shelf spacing is already suitable.
Simplicity principle
The simplest system that remains visible and accessible is usually the easiest to maintain.
Organize by Cabinet Type
Deep Lower Cabinets
Best categories include heavy cookware, appliances, mixing bowls, food-storage containers, and large baking supplies.
- Prioritize pull-outs or large accessible groups.
- Store lids vertically.
- Limit stacking.
- Keep heavy items at a safe lifting height.
- Avoid loose small food packages.
- Do not bury fragile items behind cookware.
Deep Upper Cabinets
Best categories include lightweight food, dishes, mugs, baking ingredients, serving pieces, and lightweight backstock.
- Prioritize handled bins, shelf risers, limited turntables, and readable labels.
- Avoid heavy appliances and overloaded bins.
- Do not place tiny loose packets at the back.
Deep Pantry Cabinets
Keep active food at eye and waist level, backstock behind or above, broad categories together, cans and jars visible, bottles accessible, and older food toward the front.
Avoid layered pantry chaos
A deep pantry cabinet should not become several unrelated layers of food. Use the deep-pantry guide and Pantry Organization Guide when food inventory—not cookware—is the main problem.
Create a pantry system without a pantry →
Cabinets With No Adjustable Shelves
Use freestanding shelf risers, stackable drawers, under-shelf baskets, tall category zones, vertical dividers, large-item storage, or removable bins.
Fixed-shelf principle
When shelf height cannot be changed, choose categories that naturally match the available opening.
Organize Specific Categories
Pots and Pans
Keep daily cookware at the front, store lids vertically, limit nesting, place heavy cookware in lower cabinets, and put occasional pans at the back only when they remain independently removable. If cookware is the dominant category, continue with How to Organize Pots and Pans.
Food and Pantry Staples
Use broad category groups, active food in front, backstock behind, older food forward, shelf risers for cans, turntables for suitable bottles, and no loose packets in deep back zones. Related guides: spices in a pantry, snack organization, and water-bottle organization.
See the no-pantry kitchen guide, how to organize spices, and how to organize snacks.
Small Appliances
Rank appliances by frequency, keep daily units at the front or on the counter only when justified, store accessories with the appliance, avoid stacking heavy units, verify lifting safety, and move occasional appliances to secondary storage.
Food-Storage Containers
Remove unmatched pieces, limit container types, nest only when retrieval remains easy, store lids separately or vertically, avoid one deep pile, and keep the category inside one fixed boundary. For a dedicated system, see How to Organize Food Storage Containers.
Baking Supplies
Group ingredients, separate tools from food where useful, use removable project-based groups, keep heavy mixers accessible, store trays vertically, and place seasonal supplies farther back. The dedicated baking-supplies guide goes deeper into this category.
Best Setup by Reader Situation
Renters
Use handled bins, freestanding shelf risers, turntables, stackable drawers, portable vertical dividers, and removable shelf liners. Portable systems still need to fit the opening and remain stable when loaded.
Limited budget
Start with decluttering, cabinet assignment, front-and-back zoning, reused suitable containers, shelf adjustment, and one organizer only where access still fails.
Families
Use broad visible categories, child-safe access, appropriate snack and lunch zones, clear backstock limits, easy grocery unloading, and labels only where useful.
Older adults or limited reach
Prioritize pull-outs or shallow front zones, lightweight containers, comfortable reach, stable organizers, and avoiding heavy overhead or floor-level bins.
Very small kitchens
Use deep storage for large categories, limit cabinet functions, avoid space-wasting organizers, consolidate food, protect counters, and move occasional overflow elsewhere. Pair this with How to Organize a Small Kitchen, How to Keep Kitchen Counters Clutter-Free, and How to Organize a Kitchen Counter.
Keep Deep Cabinets Visible and Easy to Reset
Reduce visual clutter inside
- Use broad, consistent zones.
- Avoid excessive micro-containers.
- Keep labels readable.
- Limit mixed packaging where it harms visibility.
- Leave retrieval space.
- Avoid unstable stacks.
Prevent counter overflow outside
Do not move unresolved categories onto counters, fill cabinet tops, or add external storage before using the deep cabinets effectively. If overflow persists, review counter-clutter control, hidden storage, and open vs closed storage before adding another organizer.
Keep kitchen counters clutter-free →
Create a weekly reset
- Bring active items forward.
- Return categories to assigned zones.
- Remove empty packaging.
- Match lids and containers.
- Check food approaching expiration.
- Remove items placed in the wrong cabinet.
- Confirm bins remain easy to lift.
- Review overflow.
Review the back zone
Check forgotten food, duplicate supplies, seasonal cookware, unused appliances, items that should move elsewhere, and containers that have become too heavy.
Back-zone principle
The back of the cabinet should be planned secondary storage—not forgotten storage.
Use a Deep Cabinet to Free Up Your Coffee Station
If coffee gear is crowding the counter, use one deep cabinet for beans, filters, syrups, backup mugs, and cleaning tools while keeping only daily brewing essentials visible. See How to Create a Coffee Station Without Counter Space, Coffee Station Ideas for Small Kitchens, Coffee Station Storage Ideas, and Coffee Station Essentials.
How to Organize Deep Kitchen Cabinets Step by Step
Choose one cabinet
Keep the project manageable.
Remove everything
See the real cabinet capacity.
Group items by function
Separate related categories.
Declutter expired, broken, duplicate, or unused items
Reduce before organizing.
Decide the cabinet’s primary function
Limit unrelated categories.
Measure the opening and interior
Include hinges, frames, and shelves.
Measure the largest stored items
Use real size, weight, and handles.
Separate daily and occasional items
Rank by frequency.
Place daily items in the front zone
Protect the best access.
Place occasional items in removable back-zone groups
Use one-step access.
Add one method only where needed
Choose a pull-out, bin, riser, turntable, drawer, or divider by category.
Test doors, shelves, and movement
Confirm full operation.
Confirm independent removal
Every item should be reachable without unloading unrelated objects.
Use the cabinet normally for one week
Observe access failures.
Simplify any difficult area
Reduce weight, categories, or steps.
Deep Kitchen Cabinet Organization Mistakes
Storing small items loose
They disappear and become difficult to inventory.
Using one large, heavy bin
The group becomes difficult to remove.
Treating shelf risers as a depth solution
They add levels but may not improve back access.
Using a turntable for every category
Circular storage can waste rectangular space.
Putting daily items behind backstock
The cabinet must be unloaded during normal use.
Mixing unrelated categories
The cabinet becomes difficult to scan and reset.
Ignoring the cabinet opening
The organizer fits inside but cannot be inserted or extended.
Overfilling pull-outs
Weight, movement, and visibility suffer.
Stacking heavy appliances
Retrieval becomes difficult or unsafe.
Forgetting the back zone
Food expires and equipment remains unused.
Buying organizers before measuring
Doors, hinges, frames, and shelves interfere.
Using too many small containers
The system creates more steps than it removes.
Which Deep-Cabinet Method Should You Choose?
| Reader situation | Best starting method |
|---|---|
| Heavy cookware in a lower cabinet | Pull-out shelf or large accessible zone |
| Lightweight food in an upper cabinet | Handled bins |
| Cans and jars | Shelf riser |
| Bottles and sauces | Turntable |
| Trays, boards, and lids | Vertical dividers |
| Small packets and snacks | Stacking drawer or category bin |
| Occasional backstock | Removable back-zone bin |
| Large appliances | Open front access or pull-out |
| Rental kitchen | Portable bins, risers, and turntables |
| Very limited budget | Front-and-back zoning without new organizers |
| No adjustable shelves | Freestanding risers or stackable drawers |
| No method improves access | Reassign the cabinet to larger items |
Final recommendation
For most deep kitchen cabinets, keep daily items at the front, group occasional items at the back in removable units, and choose organizers according to item shape, weight, and frequency—not simply because the cabinet is deep.
Shop by the Cabinet Problem
Do not buy every organizer. Match one tool to the access problem that remains after decluttering, zoning, and measuring.
Three Different Jobs
Pull-outs solve depth, risers solve unused height, and turntables solve rotation-friendly bottle and jar access.
For full-depth access
Seinloes 2-Pack Expandable Pull-Out Cabinet Organizer
A slide-out option for deep base cabinets. Measure the usable opening, frame, hinges, and interior depth before choosing it.
View on Amazon →For unused vertical space
X-cosrack Expandable Cabinet Organizer Shelf, 2 Pack
A freestanding riser for cabinets where shelf height is being wasted. It adds a level but does not solve inaccessible depth.
View on Amazon →For bottles and jars
LANDNEOO 10-Inch Non-Skid Lazy Susan Organizers, Set of 4
A rotating option for bottles, sauces, condiments, and jars when circular storage improves access without wasting too much cabinet space.
View on Amazon →As an Amazon Associate, Inplanty may earn from qualifying purchases.
Frequently Asked Questions
What is the best way to organize deep kitchen cabinets?
Keep daily items at the front, group occasional items at the back in removable units, and choose access methods according to item size, weight, and frequency.
What should be stored in deep cabinets?
Large cookware, appliances, grouped pantry categories, mixing bowls, baking equipment, serving pieces, and other large or contained categories.
How do you reach items at the back?
Use removable back-zone groups, pull-outs, handled bins, suitable turntables, or reassign the cabinet to larger items that can be removed independently.
Are pull-out shelves worth it?
They are most useful for frequent full-depth access, heavy lower-cabinet categories, and users who struggle to reach the back.
Should you use bins?
Yes for lightweight related groups, but several moderate-capacity bins are easier to use than one overloaded bin.
Are shelf risers good for deep cabinets?
They help when vertical space is wasted, but they do not automatically solve full-depth access.
When should you use a turntable?
Use one for bottles, sauces, condiments, and small jars when rotation improves access more than rectangular storage improves capacity.
How do you organize deep lower cabinets?
Use large accessible zones, pull-outs where suitable, vertical lid storage, limited stacking, and safe access for heavy items.
How do you organize deep upper cabinets?
Use lightweight handled bins, risers, limited turntables, clear categories, and avoid heavy or overloaded storage overhead.
How do you organize food in a deep pantry cabinet?
Keep active food visible at the front, backstock behind or above, older food forward, and small items grouped rather than loose.
How do renters organize deep cabinets?
Use portable bins, freestanding risers, turntables, stackable drawers, and dividers that fit the opening and remain stable when loaded.
How do you organize deep cabinets without buying organizers?
Declutter, assign one main function, create front and back zones, limit categories, and store only items that can be removed independently.
What should go at the back of a cabinet?
Occasional items, backstock, seasonal pieces, and lightweight groups that remain visible or labeled and can be removed together.
How do you stop food from expiring in deep cabinets?
Keep active food in front, rotate older food forward, use broad visible zones, and review the back regularly.
Keep Organizing Your Kitchen
Explore more ways to organize kitchen storage, pantry zones, small spaces, and coffee supplies.