
How to Organize a Reach-In Closet So Everything Stays Visible
Organize a reach-in closet by planning from the doorway inward. Measure the opening, separate long and short hanging sections, keep daily clothing within the visible center, and assign harder-to-reach side areas to lightweight or less frequently used categories. Add shelves, drawers, shoe storage, or a second rod only when each remains accessible through the closet doors.
The Finished Result
Daily clothing appears as soon as the doors open, each sliding-door position reveals a complete usable zone, side recesses no longer hide active clothes, long garments clear floor storage, the top shelf stays removable, and every drawer and bin can be used without moving unrelated items.
- Doorway width controls the plan
- Active wardrobe stays in the visible center
- Side sections have deliberate secondary functions
- Long and short hanging are separated
- Door, drawer, and bin clearance remains intact
Quick Answer
Measure the usable opening separately from the closet interior, identify the door type, and map what can actually be seen and reached from each door position. Keep active clothes in the center, use side recesses for appropriate secondary categories, add double hanging only where garment lengths allow, and test every drawer, bin, shelf, shoe rack, and rod through the real opening before finalizing the system.
Use the Closet Organization Guide for the full cluster, How to Organize a Small Closet when capacity is the main issue, and How to Organize a Walk-In Closet when the layout includes internal circulation and multiple walls.
What Makes a Reach-In Closet Difficult to Organize?
| Closet symptom | Likely cause | First correction |
|---|---|---|
| Side clothing is forgotten | Daily categories extend behind walls | Move active clothes into the visible center |
| Sliding doors hide half the closet | Layout ignores overlap | Align zones with each door opening |
| Long clothes cover shoes | Hanging heights are mixed | Create a dedicated long-hanging section |
| Upper bins are never opened | Storage is too deep or heavy | Use shallow, labeled, lightweight storage |
| Drawers cannot open | Floor unit lacks front clearance | Reduce depth or move the unit |
| Shoes block the entrance | No defined footwear zone | Add one low or vertical shoe area |
| Closet stores little despite its height | Short garments use full-height hanging | Add double hanging where justified |
| Clothes remain outside | Daily categories are inaccessible | Reassign visible prime storage |
| Door will not close | Door storage conflicts with the interior | Remove or reduce door organizers |
| Laundry return is slow | Categories are too detailed | Simplify the zones |
Reach-in success test
Every frequently used item should be visible and removable from the doorway without unloading unrelated categories.
Identify the Reach-In Closet Type
Single-door reach-in
Keep daily clothing in the narrow center opening, use shallow side storage, avoid wide drawer towers, and improve lighting in recesses.
Double hinged doors
A wider opening may expose more of the rod, but door swing, nearby bedroom furniture, and interior shelf collisions still matter.
Sliding doors
Only part of the closet opens at once. Avoid over-door storage and align major categories and drawers with fully exposed positions.
Bi-fold doors
Account for panel projection, tracks, side access, exterior furniture, and limited door-mounted storage.
Curtain or doorless closet
Full opening access improves visibility, but stronger visual order, clear floor storage, and fewer opaque bins become more important.
Measure the Interior and the Opening Separately
Interior measurements
- Width, depth, and height
- Rod length and height
- Top-shelf width and depth
- Shelf spacing
- Floor area
- Side-wall recesses
- Baseboards and hardware
- Lighting or ceiling obstructions
Opening measurements
- Total and usable opening width
- Door-panel width
- Sliding overlap
- Hinged-door swing
- Frame and trim
- Distance from opening to side walls
- Opening height
- Upper-shelf access angle
Opening principle
The usable doorway can be substantially narrower than the interior. Storage must pass through and remain reachable through that opening.
Test removal and drawer clearance
- Bins pass through the opening.
- Drawers open fully.
- Shoes come out without moving clothing.
- Hanging organizers do not block the floor.
- The doors close.
- Long garments clear shelves and drawers.
- The top shelf remains reachable.
- A person can stand directly in front of each active zone.
Audit the Wardrobe by Storage Type
Short hanging
Shirts, blouses, jackets, skirts, and folded trousers.
Long hanging
Dresses, coats, robes, jumpsuits, and formalwear.
Folded clothing
Sweaters, jeans, activewear, sleepwear, and T-shirts.
Shoes
Current, formal, seasonal, and specialty footwear.
Bags and accessories
Daily bags, belts, scarves, hats, jewelry, and small items.
Secondary storage
Seasonal clothing, formalwear, travel items, and unrelated household storage.
Remove what should not return
- Damaged or uncomfortable clothing
- Items that no longer fit
- Duplicates and unworn pieces
- Excess hangers
- Empty boxes and shopping bags
- Unused organizers
- Unrelated room clutter
Avoid rigid decluttering quotas. The layout should follow how the wardrobe needs to be stored—not only style or color.
Separate active and secondary wardrobes
Active wardrobe
Current-season daily clothing, workwear, common shoes, and everyday accessories.
Secondary wardrobe
Off-season clothing, formalwear, costumes, rarely worn shoes, and travel-specific items.
Visible-center rule
The visible center should serve the active wardrobe.
Create a Visibility Map
Define the visible center zone
Use it for daily tops, work clothes, frequently worn bottoms, current jackets, active folded clothing, common shoes, and everyday accessories.
Use side sections for suitable categories
Side recesses can hold long hanging, seasonal clothes, bags, a narrow shoe tower, garment bags, narrow shelves, or less frequent categories. Avoid daily clothing, deep mixed bins, loose accessories, and drawers that cannot open.
Align zones with sliding-door positions
Use one complete group behind the left opening and another complete group behind the right opening. Avoid splitting one daily category across both blocked halves, and place drawers only where a panel can expose them fully.
Door-position rule
Each door position should reveal a complete usable zone—not fragments of several categories.
Plan Hanging Storage
Separate long and short garments
Reserve only enough long-hanging width for dresses, coats, robes, jumpsuits, and formalwear. Short-hanging categories can use double levels where measured garment length and lower clearance permit.
Add double hanging only where appropriate
Best for
- Shirts and blouses
- Jackets
- Skirts
- Folded trousers
- Children’s clothing
Trade-offs
- Removes long-hanging space
- May block shoes or drawers
- Lower row may be hard to see
- Rod heights must match garments
- Overloading reduces access
Double-hanging verdict
Add it only after measuring garment lengths and the floor storage required below.
Place long hanging strategically
A side section often works well when the door exposes it sufficiently and long garments will not block shoes, shelves, or drawers.
Group by broad category
Work tops, casual tops, jackets, bottoms, dresses, and formalwear create a practical order. Color can be a secondary sort, but dressing and laundry return come first.
Keep the rod below maximum capacity
Clothing should slide, categories should remain visible, garments should come out independently, and clean laundry should return without compression.
Organize the Upper Shelf
Use the top shelf for lightweight seasonal clothing, bags, travel accessories, formal accessories, garment bags, extra linens where appropriate, or empty luggage when space allows.
Avoid deep heavy overhead storage
Daily clothing, loose shoes, heavy bins, and containers too deep to pass through the opening do not belong on the top shelf.
Use shallow, clearly labeled containers
Labels such as Winter, Summer, Formalwear, Travel, Swimwear, and Accessories help only when each bin holds one clear lightweight category.
Divide one continuous shelf
Use dividers, separate shallow bins, open spaces, or one section per household member. A long shelf without boundaries becomes one miscellaneous pile.
Add Folded-Clothing Storage Without Blocking Access
Hanging shelf organizer
Renter-friendly storage for sweaters, T-shirts, jeans, activewear, sleepwear, or small bags.
Trade-off: consumes rod width and may sag or hide clothing.
Low drawer unit
Useful for underwear, socks, T-shirts, sleepwear, activewear, and accessories.
Trade-off: requires full front clearance and may sit behind door overlap.
Narrow shelf tower
Can combine folded clothing, bags, and shoes or divide a shared closet.
Trade-off: consumes hanging width and can reduce visibility on both sides.
Capacity-trade principle
Every shelf, drawer, or tower replaces another form of capacity. Choose the storage resource the wardrobe actually needs.
Use shelf dividers where stacks collapse
They can separate sweaters, jeans, bags, and folded categories, but should not create sections narrower than the items they contain.
Organize Shoes in One Defined Zone
Choose a low shelf beneath short hanging, floor rack, vertical side tower, lower cubbies, compatible door organizer, or secondary seasonal storage outside the active closet.
Shoe-zone rule
Shoes should not spread across the complete closet floor.
Keep active footwear visible
Prime shoe storage should hold current-season, daily, work, and regular exercise shoes. Formal, off-season, and specialty pairs can move higher, farther to the side, or into secondary storage.
Protect hanging clearance
Check garment length, shelf height, shoe-rack depth, visibility, removal access, and floor cleaning.
Use How to Organize Shoes in a Closet for the detailed footwear system once published.
Organize Bags and Accessories
Keep daily bags accessible
Use one shelf section, dividers, hooks, a narrow side shelf, or one active-bag hook near the opening. Occasional bags can move higher or farther to the side.
Use hooks carefully
Hooks may hold belts, scarves, one daily bag, hats, a robe, or an outfit. Avoid layering multiple bags, blocking clothing or doors, and exceeding the surface or product load limit.
Contain small accessories
Use one small drawer, divided tray, shallow bin, hanging pocket, or labeled box. Visibility and easy return matter more than many tiny compartments.
Give the Floor One or Two Functions
The floor may support shoes, a low drawer unit, one hamper, short-garment storage, or one stable basket. Avoid loose clothing, shopping bags, donation piles, empty boxes, seasonal overflow, and several unrelated organizers.
Preserve cleaning access
The system should allow storage to be removed, corners inspected, dropped items retrieved, and the entrance vacuumed or swept.
Organize by Door Type
Sliding doors
Build complete zones behind each opening, avoid over-door storage, align drawers with exposed positions, and keep daily clothes usable from both panel locations.
Hinged doors
Limited hooks or lightweight storage may work after checking swing, hinge load, furniture, shelf collision, and closure.
Bi-fold doors
Keep the center clear, avoid panel and track interference, minimize door-mounted products, and set floor units behind the usable opening.
Doorless closets
Use stronger visual order, fewer opaque bins, a clear floor, functional hangers, and controlled category boundaries.
Organize a Shared Reach-In Closet
Divide the closet physically using left and right zones, upper and lower rods, separate shelf columns, drawers, shoe areas, or one shared upper shelf. Physical boundaries work better than labels inside mixed storage.
Divide by need
One person may need more long hanging, workwear, shoes, or drawers, while the other may need more folded storage, short hanging, or bags. The split does not have to be identical.
Reach-In Closet Solutions by Situation
Small reach-in
Use strict inventory limits, broad categories, double hanging where justified, minimal deep bins, one shoe zone, seasonal rotation, and a clear floor.
Wide reach-in
Create multiple complete zones, keep active clothing across the visible middle, place long hanging to one side, and use a center tower only if both sides remain usable.
Narrow reach-in
Use shallow organizers, daily clothing in the center, limited side storage, no oversized drawers, and minimal door storage.
Deep reach-in
Use shallow daily storage, pull-forward or removable secondary groups, strong lighting, and no loose rear floor storage.
Rental reach-in
Prioritize hanging shelves, portable rods, freestanding drawers, dividers, low shoe racks, and limited hooks while checking load, finish, anchoring, and lease restrictions.
One rod and one shelf
Reserve one long-hanging section, add a lower rod only under short garments, divide the upper shelf, create one floor function, and keep the center visible.
Build the Dressing and Laundry Workflow
Arrange base layers, tops, bottoms, dresses or jackets, shoes, accessories, and a daily bag in a logical sequence without creating an overly detailed system.
Make laundry easy to return
Use broad categories, visible rod sections, accessible drawers, short folded stacks, one empty-hanger location, and a predictable left-to-right or top-to-bottom order.
Return test
If clean laundry cannot be returned quickly, the layout is too dense or complicated.
Maintain the Reach-In Closet
Weekly reset
- Rehang clothing
- Return shoes
- Refold stacks
- Clear the floor
- Process temporary clothing
- Return accessories
- Remove empty hangers
- Put away laundry
- Correct category overflow
- Close and test the doors
Monthly capacity review
- Can every active category be seen?
- Do door positions expose complete zones?
- Are side sections being used?
- Do drawers open fully?
- Are shoes contained?
- Is the upper shelf manageable?
- Are clothes still left outside?
- Has new inventory entered without a home?
Overflow rule
If active clothing repeatedly moves outside the closet, reduce inventory or redesign accessibility before adding another organizer.
How to Organize a Reach-In Closet Step by Step
Identify the door type and visible opening
Start with access.
Measure the interior, doorway, side recesses, rods, shelves, and floor
Use usable dimensions.
Gather clothing, shoes, bags, and accessories by storage type
See the full wardrobe.
Remove damaged, unused, and unsuitable items
Reduce before organizing.
Separate active, seasonal, and occasional wardrobes
Protect visible prime storage.
Define the visible center zone
Keep daily clothing accessible.
Assign suitable categories to side sections
Avoid hiding active clothes.
Separate short and long hanging
Use vertical space correctly.
Add double hanging only where lengths support it
Preserve shoes, drawers, and long hanging.
Improve the upper shelf with shallow defined categories
Keep bins removable.
Add folded storage without blocking the opening
Test full access.
Create one shoe zone
Clear the floor.
Add limited bag and accessory storage
Protect visibility.
Align drawers and zones with actual door positions
Use each opening completely.
Keep the floor and entrance clear
Preserve cleaning and access.
Test dressing, drawer access, and laundry return
Observe real friction.
Add weekly and monthly resets
Maintain visibility and capacity.
Reach-In Closet Organization Mistakes
Designing from the back wall
The layout fits physically but cannot be accessed.
Putting daily clothing behind side walls
Frequently used items are forgotten.
Ignoring sliding-door overlap
Drawers and categories remain blocked.
Adding double hanging everywhere
Long garments lose a usable home.
Installing an oversized center tower
Both hanging sections become narrow or inaccessible.
Using deep top-shelf bins
Contents become hidden and difficult to remove.
Filling the floor with shoes
Access and cleaning become difficult.
Adding drawers without clearance
The drawers cannot open fully.
Using door storage without collision checks
The doors no longer close correctly.
Keeping seasonal clothing in the center
Daily clothing becomes crowded.
Treating side recesses as miscellaneous storage
Items disappear behind walls.
Using too many categories
Laundry return becomes slow.
Buying organizers before auditing
The system is built around excess inventory.
Filling the closet to maximum capacity
Clothes cannot move and new laundry cannot return.
Which Reach-In Closet Strategy Should You Use?
| Reader situation | Best starting strategy |
|---|---|
| Mostly short garments | Double hanging plus limited long section |
| Many dresses or coats | Dedicated side long-hanging zone |
| Sliding doors | Align complete zones with each opening |
| Narrow central opening | Keep daily clothing in the visible center |
| Deep side recesses | Use occasional or removable categories |
| Many folded clothes | Narrow shelf tower or low drawers |
| Shoes cover the floor | One low rack or vertical side tower |
| Upper shelf is chaotic | Shallow labeled categories |
| Shared closet | Physical section division |
| Rental closet | Hanging shelves and portable units |
| Drawers cannot open | Reduce unit depth or move them |
| Clothes remain outside | Improve active-category accessibility |
| Rod is overcrowded | Reduce inventory before changing hangers |
| Door does not close | Remove conflicting door or floor storage |
Final recommendation
Plan from the doorway inward, keep daily clothing in the visible center, use side sections for suitable secondary categories, separate long and short hanging, and add organizers only when they remain fully accessible through the opening.
Verified Product Examples
Do not combine every item into one maximum-capacity setup. Measure the usable opening, identify the door type, and choose only the organizer that preserves visibility, door movement, drawer extension, bin removal, clothing movement, and laundry return.

Rubbermaid Configurations Deluxe Custom Closet Kit, 3–6 Feet
Creates adjustable shelf and hanging zones across one measured reach-in wall. Check interior and opening width, wall construction, side recesses, door overlap, shelf depth, rod height, and installation requirements.
Verified ASIN: B000VSCA7C
Simple Houseware Adjustable Closet Hanging Rod, White
Adds a lower rod beneath short garments. Confirm garment length, existing rod height, lower clearance, load, and whether the doors expose both levels.
Verified ASIN: B0BN78VZ96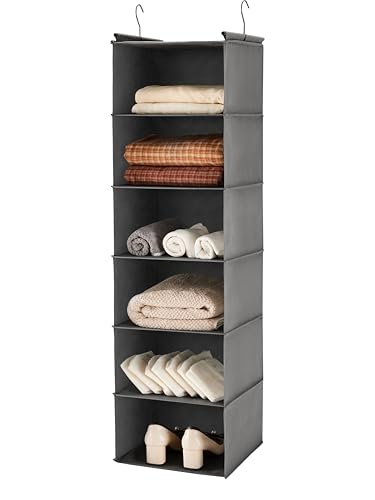
MAX Houser 6-Tier Hanging Closet Organizer
Converts rod width into portable shelves for folded clothing or small bags. Check width, length, closet depth, opening, garment clearance, and category weight.
Verified ASIN: B07FX8RZJZ
Clear Acrylic Shelf Dividers for Closet Organization, 6-Pack
Divides a continuous upper shelf into visible sweater, bag, seasonal, or household-member sections. Confirm shelf thickness, depth, divider height, and removal access.
Verified ASIN: B077W69BQC
IRIS USA 3-Drawer Slim Narrow Storage Organizer
Adds contained storage in one exposed section. Confirm width, depth, height, drawer extension, door position, baseboards, garment clearance, wheels, and stability.
Verified ASIN: B0F56ZTF2Y
Simple Houseware 3-Tier Stackable Mesh Shoe Rack
Creates one visible floor-level shoe boundary. Check width, depth, shoe height, hanging-clothing length, door opening, and floor-cleaning access.
Verified ASIN: B0B6GZV3R4
Amazon Basics Slim Velvet Non-Slip Hangers, 50-Pack
Reduces hanger bulk after inventory is under control. Use for suitable lightweight garments—not to compress an already overcrowded rod.
Verified ASIN: B0756D8W87
Sterilite 15-Quart ClearView Latch Boxes, 2-Pack
Provides visible lightweight storage for seasonal accessories or travel items. Check depth, loaded weight, safe reach, and whether the bin passes through the usable opening.
Verified ASIN: B0100XS56W
EZVALO Rechargeable Motion Sensor Closet Lights, 4-Pack
Improves visibility in side recesses, lower zones, and sections blocked by the frame. Check adhesive compatibility, sensor position, charging access, and removal marks.
Verified ASIN: B0FQB6Z836
Command Large Matte Black Double Hooks, 2-Pack
Creates one limited point for lightweight belts, scarves, a robe, or one daily item. Respect the listed load limit and surface instructions; do not use for heavy bags or overflow.
Verified ASIN: B08JH7TYNKRecommended product logic
Measure the opening first, keep active clothing in the center, use a second rod only for one short-garment section, choose hanging shelves or a drawer unit according to available rod width and floor clearance, divide the top shelf with dividers or a few shallow bins, create one shoe zone, add lighting to inaccessible recesses, and test everything from every door position.
Affiliate disclosure: Inplanty may earn a commission from qualifying purchases made through links on this page, at no additional cost to you.
Frequently Asked Questions
What is the best way to organize a reach-in closet?
Plan from the doorway inward, keep active clothes in the visible center, assign side recesses to suitable secondary categories, and preserve complete access to every storage zone.
How do you maximize a reach-in closet?
Use vertical space where garment length allows, divide the upper shelf, create one shoe zone, and preserve enough open rod and floor capacity for normal use.
How should a reach-in closet be divided?
Use a visible active center, one short-hanging section, one long-hanging section, folded storage, a defined shoe area, and limited secondary side storage.
How do you organize a reach-in closet with sliding doors?
Align complete zones with each exposed door position and place drawers only where a panel can reveal them fully.
Should a reach-in closet have double hanging rods?
Only when short garments dominate and the lower rod will not block shoes, drawers, long clothing, or visibility.
What should go in the side sections of a reach-in closet?
Long hanging, seasonal clothing, bags, narrow shelves, garment bags, shoe towers, or less frequent categories.
How do you organize a small reach-in closet?
Use strict capacity limits, broad zones, minimal deep storage, one shoe area, seasonal rotation, and double hanging only where justified.
How do you organize shoes in a reach-in closet?
Keep active shoes in one visible low rack, shelf, or side tower, and move occasional pairs to secondary storage.
What should be stored on the top closet shelf?
Lightweight seasonal clothing, travel accessories, formal accessories, garment bags, or a few shallow labeled bins.
Can drawers be added to a reach-in closet?
Yes when they align with a fully exposed door position, open completely, and do not block hanging clothes, shoes, or the entrance.
How do renters organize a reach-in closet?
Use portable rods, hanging shelves, slim drawers, dividers, low shoe racks, removable lights, and limited hooks after checking load and lease restrictions.
How do two people share a reach-in closet?
Divide the physical space into clear sections based on storage needs rather than mixing items within the same zones.
How much empty space should remain on the rod?
Enough for garments to slide, individual pieces to be removed, and clean laundry to return without compression.
How do you keep a reach-in closet organized after laundry?
Use broad visible categories, accessible drawers, short folded stacks, an empty-hanger location, and a predictable return order.